
pvc lamps
PVC lamps
This post may contain affiliate links. Read our disclaimer here.
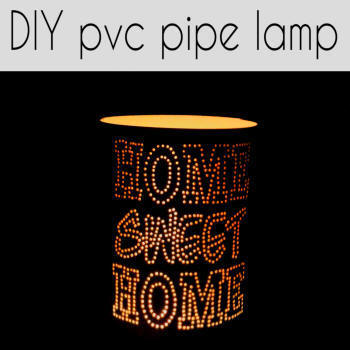
I LOVE crafting with PVC. I've made bird houses, these awesome pvc yard birds and now these lamps! Who knew you could take a sewer pipe and turn it into a beautiful lamp?!
And the possibilities are endless with these lamps. You could write a name on the lamp, draw out a fun design or create your own images. They are so versatile and fun to make. Just keep in mind, that if you plan to sell them, do not use any one elses images, you'll need to design your own. Lucky for you, I created 10 patterns (including the "home sweet home" pattern on this lamp) that you can print off and start selling your own lamps right away.
You can see a sample and get all the patterns here.
The best part about these is they are ready to go and will be any time you need them - just print them off. No need to worry about creating a new pattern every single time!
What you'll need:
4" pvc pipe (I use schedule 35 - the thinner walled non-perforated sewer drain pipe)
rotary tool with attachments
1" thick wood
chop saw
jigsaw
acetone or sander to remove the manufacturers ink
drill
1 1/4" hole saw
4 1/4" hole saw
putty knife
caulk
snap-in socket light kit
sandpaper or sander
your pattern and some tape
Now put on your safety glasses and let's start crafting!
Start by preparing your pattern. You can draw out an image on your computer or paper and then convert it into a pattern on dots. It can be very time consuming and extremely hard if you aren't great at drawing. That's why I created these 10 images that you can download and then print off an image whenever you need it. You can also use my images to create lamps that you can sell as your own. Here is a preview of the patterns:
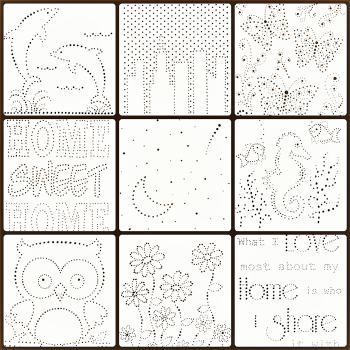
You can get more info on these patterns here.
I usually print off my pattterns in a 5X7 or an 8X10 size. I use the smaller printed size when I want an image to be more fully seen from the front, like this Home Sweet Home image and I use the larger printed size for images like my underwater or flower designs.

Start by cutting your pipe to size with your cut off saw or a hacksaw. Your pattern size will determine your pipe length. I like to leave about an inch on the top of the design and about 3 inches on the bottom of the pipe to allow for the light kit assembly.
Next I like to remove all of the manufacturer's ink. You can use acetone and a clean, white cloth or you can use a sander. Sandpaper is usually not enough to remove the ink, so I've always used my sander. Quick and easy! :)

Take your printed image and tape it in place on to your pipe. Then take our your rotary tool


Once you are sure all your holes are drilled, remove your pattern. Now you will need your putty knife to scrap off all of the pvc that is stuck around all of the holes your just drilled. When you have that all scraped off, go over the entire pipe with some sand paper or your sander to remove the stray pieces and to blend the finish of the entire pipe. Then go back with your rotary tool

Now it's time to prepare the lamp kit part for the bottom of your lamp. Please use caution.

Take your 1" thick wood and using your drill and your 4 1/4" hole saw, cut out a circle from the wood. For this project, you are using the wood from the inside of the circle you cut out. Carefully take the wood out from the inside of the hole saw. This circle is what you will use to fit inside the bottom of your pipe. I used this hole saw
Then take your 1 1/4" hole saw

Before you secure your wood in place, you will need to cut out a notch in the back bottom of your pipe to allow for your electrical cord to fit through. This will make sure your lamp stands nicely on a table or floor without tipping over because of the cord. Use your jigsaw

Now you can secure your wood in place. If your wood fits tight, use a hammer to lightly tap it into place so that it sits level just flush with the top of your electrical cord opening. When you have your wood in place, if it is not completely tight and secure and is a bit loose, use some caulk around the edge of the wood where it meets the pvc to hold it in place. Let the caulk cure according to the manufacturers directions.
When your caulk has set you can attach your snap-in socket lamp kit


Then light it up! Or gift them. Or sell them. If you make one, you'll end up making more.
Get creative!
You could use colored light bulbs instead of clear ones. You could also spray paint the outside of your pipe.
Try using the thicker schedule 40 pvc pipes and instead of going all the way through the pipe with your attachments, make shallower dents into the pipe to give a different glowing effect. There are so many possibilites!
Ready to start making your own lamps? Head over here to get all of my patterns.
Want another amazing PVC pipe DIY?
Check out these awesome PVC pipe birds and animals you can make too!
diy
Want more DIY's?CrazyDIYmom.com Contact Us Privacy Policy Disclaimer About me